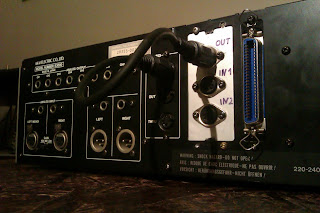
I really like my Akai S3000. It is an oldschool beast of a sampler, and if you know your way around the menu structure, you're able to get complex sounds in very little time.
However, there were a few things that annoyed me a bit.
Here is what I did:
 First of all, I really wanted a second MIDI input. Constantly replugging Midi cables (while crawling in the narrow space behind the rack) is not my idea of fun. I made an addon card based on the UCApps.de Midi Merger (sorry, no direct link possible). It does exactly what the name suggests: it merges two MIDI inputs to a single output. Now I route that output to the MIDI IN of the Akai with a short cable - voila! - two MIDI inputs. (Yes, I know in the first picture the two optocouplers are not yet in their sockets...) Now I can connect my hardware sequencer and my MIDI interface at the same time, and I can use them separately or in combination.
The other major thing was the floppy drive. Juggling all those 1.44MB disks is sooo 90ies, and when I came across an old SCSI Harddisk (Quantum ProDrive with whopping 120MB - that is megabytes) I put it in the sampler. This gave me a bit of an headache, as there is NO documentation for the S3000 on the net whatsoever (only for the S3000XL, which is a different animal). I won't go into detail about the hellish nightmares here, but let me say this: why on earth did Akai decide to use standard SCSI cables, but then they build a sampler that requires them to be plugged in backwards??? We'll never know.) Anyway, after waaaay to much time experimenting and reading obscure forum posts from like 1997 or so, I got it to work by filing off the notch on the cable that (kinda rightfully) forces you to plug it in only one way.
I could have been happy, but there is always a ...but.
When you turn on the sampler, it will boot its OS from a ROM, then it will look for an updated OS on the disk, and then boot into that. Only, the old and slow HDD never was ready spinning up at that point, which always gave me a "disk not ready" error. I always had to load the updated OS manually. How annoying.
I added a small 555-based "delayed power on" circuit to the addon card. This handy dandy thing closes a relay after 3 seconds. This relay actually switches the +5V power line going to the mainboard.
When you power on the Akai now the following is happening: power is applied to the harddisk, which starts spinning. 3 seconds pass, the relay (the small orange box on the back of the circuit board) closes with a CLICK. Only now the mainboard is powered on, thus the sampler starts to boot. Because the HDD now has had some extra time to get ready, the S3000 can happily read the OS from the disk and boot into that. READY.
I am also thinking of making the frontpanel detachable like on the S6000, but that is for another day.


